De 0xc000000e- fout bij het opstarten van Windows betekent dat u te maken hebt met beschadigde opstartconfiguratiegegevens . De opstartconfiguratiegegevens zijn een globale opslag voor alle opties en instellingen met betrekking tot opstarten op nieuwere Windows-pc's.
U krijgt deze foutmelding wanneer u uw apparaat probeert op te starten, en u krijgt een zwart scherm te zien met instructies voor het repareren van uw computer met behulp van een installatieschijf of een herstelschijf. Helaas is het hebben van die herstelschijf de enige manier om dit probleem op te lossen, dus u moet er een hebben voordat u begint. Als je het niet hebt, is het vrij eenvoudig om er een te maken met behulp van de Rufus- of Windows Media Creation-tool vanaf een andere pc of een laptop.

U moet ook opstarten in uw BIOS om de opstartvolgorde te wijzigen en uw pc te laten opstarten vanaf de herstelschijf in plaats van uw harde schijf. Gebruik hiervoor de volgende stappen:
- Voer de BIOS- of UEFI- instellingen in door op de sleutel van de fabrikant van uw moederbord te drukken voordat Windows opstart. Deze sleutel is meestal Esc, Delete, F2, F8, F10, F12 of Backspace, afhankelijk van de fabrikant. U kunt online zoeken naar hoe u het BIOS opent, gevolgd door uw computermodel.
- Eenmaal binnen navigeert u naar de Boot.Gebruik de instructies in het BIOS om uw opstartvolgorde te wijzigen en stel de cd-rom of de USB-poort in als het eerste apparaat, afhankelijk van of uw herstelschijf een cd of een flashstation is .
- Sla uw instellingen op en sluit af.

Methode 1: Bouw de opstartconfiguratiegegevens opnieuw op
Om dit te doen, moet u uw computer opstarten vanaf de herstelschijf. Als u uw BIOS met de bovenstaande stappen heeft geconfigureerd, kunt u dat doen door op een willekeurige toets te drukken zodra de prompt op uw display verschijnt. Nadat de computer is opgestart vanaf de herstelschijf, voert u de volgende stappen uit om de BCD opnieuw op te bouwen:
- In de Windows Setup dialoogvenster set alles op de juiste waarden, selecteert u uw taal en klik op
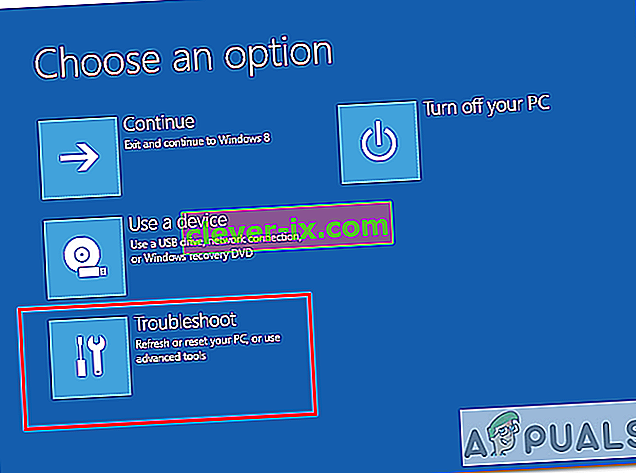
- Klik in de linkerbenedenhoek op Uw computer herstellen en kies Problemen oplossen in het scherm Kies een optie.
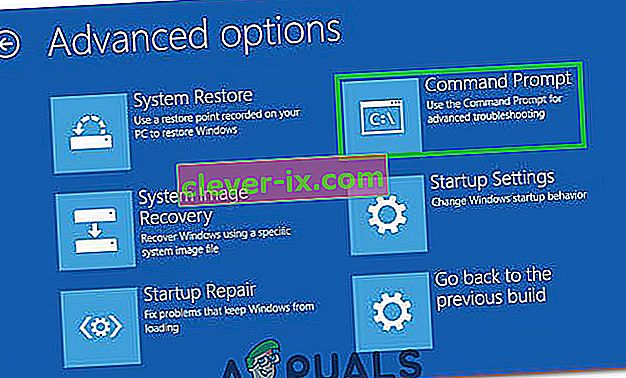
- Klik in het scherm Problemen oplossen op Geavanceerde opties en klik op Opdrachtprompt.
- Wanneer de opdrachtprompt wordt geopend, typt u de volgende opdrachten en drukt u na elk van de opdrachten op Enter op uw toetsenbord:
bootrec / scanos bootrec / fixmbr bootrec / fixboot bootrec / rebuildbcd
- Start uw computer opnieuw op en deze zou prima moeten opstarten, zonder het probleem opnieuw onder ogen te zien.

Methode 2: Herstel uw besturingssysteem met de herstelschijf
Deze methode herstelt ook uw besturingssysteem met de opdrachtprompt van de herstelschijf en u zou in Windows moeten kunnen opstarten zonder het probleem opnieuw onder ogen te zien. Start op vanaf de herstelschijf en volg de onderstaande instructies.
- Gebruik stap 1 tot en met 3 van de vorige methode om naar de opdrachtprompt van de herstelschijf te gaan.
- Eenmaal binnen de opdrachtprompt typ je de onderstaande opdrachten, gevolgd door een Enter op je toetsenbord om ze uit te voeren. Het hulpprogramma StartRep.exe corrigeert de waarden van de opstartomgeving en zou de BCD-fout moeten herstellen. Houd er rekening mee dat u deze stap mogelijk meerdere keren moet herhalen als dit niet lukt.
cd x: \ sources \ recovery StartRep.exe
- Als de vorige stap van het repareren van Windows niet heeft geholpen, typ dan bcdedit in de opdrachtprompt om de waarden voor Windows Boot Manager te zien.
- Let op de waarden voor Device . Als ze onbekend zijn , typ dan de volgende opdrachten, elk gevolgd door een Enter om ze uit te voeren. Merk op dat u C: indien nodig moet vervangen door de partitie waarop uw besturingssysteem is geïnstalleerd.
bcdedit / set {DEFAULT.EN_US} apparaatpartitie = c: bcdedit / set {DEFAULT.EN_US} osdevice partitie = c: bcdedit / set {BOOTMGR.EN_US} apparaatpartitie = c:- Wanneer de opdrachtprompt is voltooid, sluit u deze, verwijdert u de herstelschijf en start u uw systeem opnieuw op. Het zou nu geen problemen moeten hebben om op te starten.
Het enige nadeel van deze oplossingen is dat ze een herstellende drive, geduld en sterke zenuwen vereisen. Als u ze echter volgt zoals ze zijn beschreven, moet u de fout die u krijgt oplossen en uw apparaat blijven gebruiken zoals voorheen.
Methode 3: Schakel Windows 10 WHQL-ondersteuning in BIOS in
De instelling voor Windows 10 WHQL-ondersteuning bestaat in sommige OEM's. Het heeft twee basisfuncties: controleert op ondertekende stuurprogramma's tijdens het opstartproces en stelt u in staat UEFI-ondersteuning in te schakelen. Als u Windows 10 gebruikt, moet u dit inschakelen, waarna uw computer normaal kan opstarten. Als het echter niet is geselecteerd, kan uw computer opstarten in fout 0xc000000e. U hebt dus toegang tot het BIOS om te zien of de instelling voor Windows 10 WHQL-ondersteuning is ingeschakeld. Als dit niet het geval is, schakel het dan in om het te proberen.
Houd er rekening mee dat de instelling voor Windows 10 WHQL-ondersteuning niet op alle computers wordt ondersteund. Als uw computer dit niet heeft, kunt u gaan controleren of de UEFI-ondersteuning op uw computer is ingeschakeld. Als dit niet het geval is, kunt u het inschakelen om te zien of de foutcode 0xc000000e verdwijnt. Om het in te schakelen:
- Sluit uw computer volledig af en laat deze minimaal een paar minuten staan.
- Nadat u er zeker van bent dat er voldoende tijd is verstreken, start u de computer opnieuw op en ziet u de optie " Druk op deze knop om op te starten in de BIOS-modus ".
- Druk op de knop om op te starten in de BIOS-modus.
- Na het succesvol opstarten in de BIOS-modus, controleert u of er een Windows WHQL-instelling is in de BIOS.
- Als het aanwezig is, drukt u op "Enter" om het te selecteren nadat u het hebt gemarkeerd met de pijltjestoetsen, en selecteert u de optie "Ingeschakeld" om het op uw computer in te schakelen.

- Controleer of dit het probleem oplost.

Als Windows 10-opstartfout 0xc000000e nog steeds verschijnt nadat u de Windows 10 WHQL-ondersteuningsinstelling of UEFI-ondersteuning hebt ingeschakeld, moet u mogelijk de BIOS / UEFI-configuratie op uw computer opnieuw instellen.
Methode 4: BCD opnieuw opbouwen via Easy Recovery Essentials
Easy Recovery Essentials is een geautomatiseerde systeemherstelfunctie met één klik die volledige reparatie en reconstructie van de BCD omvat om de "0xc000000e" -fout op te lossen, zelfs in gevallen waarin Windows niet opstart als gevolg van de fout.
De geautomatiseerde bootreparatiecomponent van EasyRE zal alle BCD-gerelateerde problemen aanpakken, de BCD repareren of deze helemaal opnieuw creëren met de juiste codering en het juiste pad voor de partitie die weigert correct te laden. Het markeert de schijf ook als online om ervoor te zorgen dat deze correct werkt.
Easy Recovery Essentials lost gegarandeerd de "0xc000000e" -fout automatisch op met behulp van de ingebouwde optie voor automatische reparatie. EasyRE is momenteel beschikbaar voor Windows XP, Vista, 7, 8, 10 en kan worden gedownload en aangemaakt op elke pc.
- Neem een andere computer die u zou kunnen gebruiken om een USB te maken die we zullen gebruiken om de computer vanaf op te starten.
- Download Easy Recovery Essentials vanaf hier.

- Verbrand de afbeelding.
- Start uw pc op vanaf de Easy Recovery Essentials-cd of USB die u hebt gemaakt.
- Zodra EasyRE actief is, kiest u de optie "Automated Repair" en klikt u op Continue.
- Nadat EasyRE de stations van uw computer heeft gescand, identificeert en selecteert u de stationsletter voor uw Windows-installatie in de lijst en klikt u vervolgens op de automatische reparatieoptie om te beginnen.
- Easy Recovery Essentials begint met het analyseren van de geselecteerde schijf op problemen. EasyRE zal testen op fouten met de schijf, partitie, bootsector, bestandssysteem, bootloader en register en proberen om deze automatisch te corrigeren. Er is geen tussenkomst vereist, aangezien de reparatie van EasyRE volledig geautomatiseerd is.
- Zodra het proces is voltooid, zal EasyRE zijn bevindingen rapporteren. Klik op de knop Opnieuw opstarten om uw pc opnieuw op te starten en de wijzigingen te testen.

Methode 5: BIOS / UEFI-configuratie opnieuw instellen
Sommige gebruikers zeiden dat hun fout 0xc000000e-probleem is opgelost door de BIOS / UEFI-configuratie opnieuw in te stellen. U kunt dus overwegen deze methode te proberen om te zien of dit probleem kan worden opgelost.
Stap 1. Open het BIOS-menu
Om het BIOS terug te zetten naar de standaardinstellingen, moet u het BIOS-menu openen en eerst de optie Standaardinstellingen zoeken.
Windows 10-gebruikers hebben toegang tot geavanceerde opstartopties Windows 10 en komen in het BIOS-menu. U kunt op Start -> Aan / uit klikken, de Shift-toets ingedrukt houden en op de knop Opnieuw opstarten klikken om Windows opnieuw op te starten in de Windows Herstelomgeving. Klik vervolgens op Problemen oplossen -> Geavanceerde opties -> UEFI Firmware-instellingen en klik op Opnieuw opstarten om het BIOS-instellingenscherm te openen.
Alternatively, you can also restart your computer normally and press the required key in the startup screen to boot into the BIOS settings window. The hotkey is varied from different computer manufacturers, and it could be F12, Del, Esc, F8, F2, etc.
Step 2. Find the Setup Defaults Option
The name and location of the “Setup Defaults” option may be different from various computers. It generally calls like: Load Default, Load Setup Defaults, Load Default Settings, Load BIOS Defaults, Load Optimal Defaults, etc.
Use the arrow keys on the computer keyboard to find the BIOS setup default option in the BIOS settings screen. You may find it in one of the BIOS tabs.
Step 3. Reset BIOS
After you find the Load Setup Defaults option, you can select it and press the Enter button to start resetting the BIOS to factory default settings in Windows 10.
At last, you can press F10 to save and exit BIOS. Your computer will automatically reboot. If you need to change BIOS settings again in the future, you can follow the same instructions to access BIOS again to change it.
Method 6: Mark Boot Disk As Online
It is possible in some cases, that the disk that you have connected to the computer or the USB that you are trying to boot from has been marked as offline by the computer. Some computers tend to prevent extra applications, hardware, and other things from being able to run as soon as the computer starts because it allows for more convenient and fast startup experience. Therefore, in this step, we will be marking the Disk as online.
You still need to use a bootable USB medium to do this job. We will show you a step-by-step guide here:
- After booting your computer from the bootable USB drive, you need to go to Next > Repair your computer. Then, you will enter WinRE.
- Go to Troubleshoot > Advanced options > Command Prompt.
- Make sure to properly enter your login credentials if you are asked by the computer.
- Type in the following command inside the command prompt to successfully launch the disk part utility on your computer.
diskpart
- Type in either one of the following commands in the next window to list the currently connected disk drives to your computer.
List Disk List Volume
- Once the disks have been listed, you need to identify the disk that contains the Windows operating system and the one that you want to mark as active.
- After identifying it, select the disk using the following command and replacing the alphabet with the driver letter of that disk.
select disk A Select Volume A (Replace A with the Drive Letter)
- After you have successfully selected the disk, you must mark the disk as online in order to initiate the recognization process of the disk at startup. Use the following commands to do that.
Online Disk Online Volume
- Type in the following command to successfully get out of the command prompt and restart your computer after that.
Exit
- Check to see if marking the Disk as online has fixed your issue.

Method 7: Check your data cables, BIOS and drivers
Unplug all HDD data cables, and then plug them again. Revert to the previous drivers and BIOS settings if they were changed, or use “Restore factory settings” option in the BIOS. Make sure to write down all current BIOS settings that were previously selected, just in case it is required to switch back. If the error is caused by a change of the SATA disk controller’s mode in the BIOS or firmware, the fix can be as simple as entering the BIOS and toggling the SATA controller’s “mode” setting. The exact instructions differ from one manufacturer to the other, but the options will resemble what is shown in the screenshots below.
To check the boot order, follow these steps:
- Restart the computer
- Press the necessary key to open the BIOS menu. This key depends on the computer manufacturer and computer model. This is usually listed on the first screen that appears on the monitor. It can be any of the following: Esc, Del, F2, F8, F10 or F12.
- If the screen shows multiple keys, find the key to open “BIOS”, “setup” or “BIOS menu”
- Attempt to toggle between all three (or more) modes until a combination that results in Windows booting successfully once more is found.
Method 8: Boot Windows In Safe Mode
If above solutions didn’t fix the problem, then Start Windows into safe mode. This will start your PC with minimum system requirements, will not load startup programs, add-ons etc. And allow performing troubleshooting steps to fix Boot Error 0xc000000e:
Before you enter the safe mode, you need to enter the Windows Recovery Environment (winRE). To do this, you will repeatedly turn your device OFF, then ON:
- Hold down the power button for 10 seconds to turn off your device.
- Press the power button again to turn on your device.
- On the first sign that Windows has started (for example, some devices show the manufacturer’s logo when restarting) hold down the power button for 10 seconds to turn off your device.
- Press the power button again to turn on your device.
- When Windows restarts, hold down the power button for 10 seconds to turn off your device.
- Press the power button again to turn on your device.
- Allow your device to fully restart and you should boot into the Windows Recovery Environment.
Now that you are in the Windows Recovery Environment, you will follow these steps to take you to safe mode:
- On the Choose an option, screen, select “Troubleshoot” and then “Advanced options.”
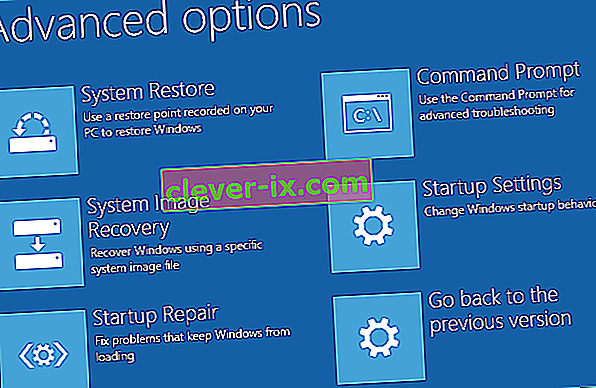
- Now click on “Startup Settings” and click on “Restart.”
- After your device restarts, you’ll see a list of options. Select option “4” from the list or press “F4” to enter Safe Mode.

Note: If you need to exit safe mode, simply restart your device, or:
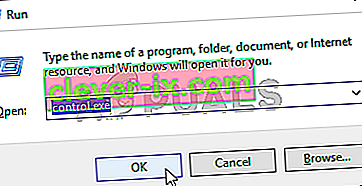
- Press the “Windows logo key + R.”
- Type “msconfig” in the Run box and then select “OK”.

- Select the Boot tab and under Boot options, clear the Safe boot checkbox.

Method 9: Check your disk with CHKDSK utility
If the hard drive has its file integrity compromised, it is possible to use built-in Windows CHKDSK utility to scan the disk and fix the file system errors.
- Connect a USB drive that has been made bootable or insert the Windows Installation Disk on your computer.
- After connecting one of these, boot from that connected device.
- After booting your computer from the device, click on “Next” and then on the “Repair your Computer” option.
- On the next window, click on “Troubleshoot” and then on the “Advanced” Option.

- On the next screen, make sure to select the “CommandPrompt” option to successfully launch into the command prompt.
- Provide the login credentials of your account in order to boot inside the cmd.
- Inside the command prompt, type in the following command to successfully run the check disk utility on your computer.
chkdsk C: /f (Make sure to replace the "C" with the Drive letter of your partition).
- Confirm any on-screen prompts and wait for the scan to be fully completed.
- Check to see if the issue is fixed by performing this step.
Method 10: Disable fast startup Feature
If your computer has been set up to use the Fast Startup feature, you might be getting this error message on your screen because of doing so. The Fast Startup feature is known to malfunction with some operating systems and hardware combinations.
Basically, when enabled, the feature automatically sends some launch configurations to be stored in your RAM to allow for a faster startup as indicated by its name but this configuration data can sometimes be corrupted which can lead to this error on your computer. Therefore, in this step, we will be disabling it completely. For that:
- Press “Windows” + “R” to open the Run prompt.
- Type in “Control Panel” and press “enter” to launch the classical Control Panel interface.
- Inside the control panel, click on the “Hardware and Sound” option and then select the “Power Options” button.

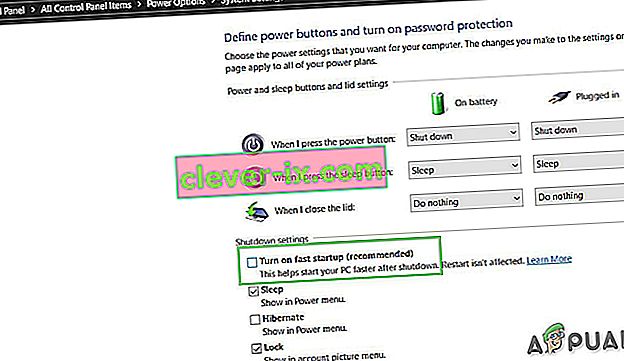
- Inside the power options, click on the “Choose what the power button does” from the left side.
- Click on the “Change Settings” option if the fast startup option is greyed out.
- Make sure to uncheck the “Turn on Fast Startup” option and save your changes.
- Closeout of the window and terminate any unnecessary applications.
- Click on the “Start Menu”, click on the “Power Options” and select “Shutdown” from the list.
- This option should completely power down your computer and after performing a complete shutdown, wait for some minutes before turning your computer back on.
- After the computer turns back on, check to see if the error message is fixed.
Note: This solution can only be applied if you are able to sometimes boot up your computer normally and are only encountering this error momentarily.


Method 11: Repair Corrupted System Files
It also possible in some situations that certain system files might have been corrupted due to a storage failure or due to some other reason. Therefore, in this step, we will be performing a complete repair of the corrupted system files and then we will check to see if doing so fixes this issue. For that:
- Press “Windows” + “R” to open the Run prompt.
- Type in “cmd” and then press “Shift” + “Ctrl” + “Enter” to launch the command prompt with admin privileges.

- Type in the following commands one by one and press “Enter” after each to successfully run an SFC scan and a DISM Scan on your computer.
DISM /Online /Cleanup-Image /RestoreHealth sfc /scannow
- Restart your computer completely once these scans are completed.
- Check to see if by performing these scans, you were able to fix this issue on your computer.

Method 12: Run Windows Startup Repair
Startup Repair is capable of diagnosing and fixing the found issues. For example, it can automatically scan system files, registry settings, configuration settings, etc. and try to fix the problem on its own. Startup Repair is especially useful when your computer is unbootable. Since your computer fails to boot, Windows can boot into WinRE automatically. While, if it doesn’t appear, you can interrupt the boot process three times in a row, and then the WinRE screen appears. Alternatively, if you have a bootable USB medium, you can also set your computer to boot from it and go to Repair your computer to enter WinRE.
After you have successfully booted into the Windows Recovery Environment, click on the “Troubleshoot” option, and from there, select the “Advanced Options” screen. Inside the advanced options, select the “StartupRepair” button to successfully initiate the Startup Repairing process. Windows will begin to diagnose your computer automatically. When the process ends, your computer will restart automatically. You can wait to see whether it can boot successfully.

Tijdelijke oplossing: zorg ervoor dat er geen extra apparaten zijn aangesloten voordat u naar de opdrachtregel of Opstartherstel springt, het is het beste om opnieuw te herstarten met het minste aantal apparaten en externe schijven dat op de computer is aangesloten. Dit zorgt ervoor dat niets dat onlangs aan de computer is toegevoegd dit probleem niet veroorzaakt. U kunt het beste alle recente USB-drives, cd's, dvd's enz. Loskoppelen. Dit omvat ook een geheugenkaartlezer. Zorg ervoor dat alle externe schijven en USB-sticks of USB-jump-drives zijn losgekoppeld en probeer het opnieuw.


